
I used to spend a lot of time sitting down at my computer working. I'm talking about hours every day sitting in an office chair. Unsurprisingly, my back was really bothering me. I tried getting up every hour or so and taking a lap around the building. That helped some. I also started a whole new set of stretches, which alleviated the pain somewhat but didn't stop the damage from occurring in the first place. I even tried sitting on an exercise ball at work (the damn thing kept deflating, and it never was really high enough to feel comfortable at the desk). This was turning into a serious problem. Around the same time I bruised my tailbone. This transformed sitting all day from an uncomfortable and unhealthy practice to an excruciating trial. Something had to change.
A friend told me that he had converted his desk into a
standing desk, and that maybe I should consider doing the same. I started looking around online, and I realized that
lots of people have made the switch. I also realized that I was probably doing my body
a lot more harm than I thought sitting there all day.

So I decided to give it a try. I didn't want to invest too much money in case I didn't end up liking the set up (also, we never really have than much money to spend). To that end I used some big hard cover books to raise up my keyboard, mouse pad, and monitor to the appropriate levels. What are the appropriate levels? Sit down in front of your computer, and put your hand on the keyboard. Make sure you are comfortable. Now keep your arms locked in place and stand up. your keyboard should be where your hands are now. Your monitor should be directly in front of your eyes.

I tried my makeshift standing desk for the next several months. At first I went back and forth between it and our desktop (which is still arranged for sitting). I had to add some books here and remove some there to get the heights just right. After I got used to it I really loved it. I move more when I am standing, and it helps keep me on task. My back feels much better as well. I am planning on building permanent risers to put under my roll top desk to make it the right height without all of the books.
Want to give it a try? My advice is to take it slow. Don't go more than an hour or two straight standing at first. Also, wear comfortable shoes and remember not to lock your knees.
*UPDATE: I saw a pile of 5 inch bed risers at Big Lots (4 risers for $5 dollars) and I popped them under the legs of my roll top desk (OK, I laid on my stomach and carefully maneuvered them under all eight legs while my dear husband picked up various sides of the desk and swore about how heavy a 100 year old solid oak desk can be). The desk is the perfect height! I am not using any books or other props. Plus, now I have all of this room to spread my books and articles out while I am working. Most sites recommend around an 8-12 inch increase from a sitting to standing desk, but I guess that being 5'3" has its advantages. I will post a picture soon.
Keywords: standing desk, back pain, non-traditional desks, make your own standing desk, DIY, proper height for a standing desk
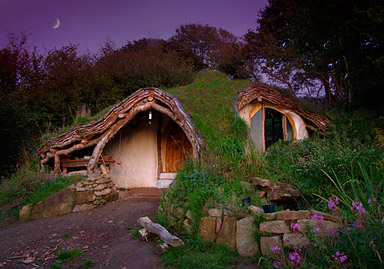 So, like many people, the hubby and I have a dream. Not a Martin Luther King Jr. kind of dream, but one which is very dear to us none the less: our very own earth sheltered home. I like to plan it out or look at pictures online when I am having a bad day. My husband wants one because he thinks they are awesome, and because he loves the Lord of the Rings books. He wants a hobbit house - much like the one pictured on the right. However, he also wants our dream home to be quite sizable. In short, he wants a giant hobbit house (did I mention that he is 6'7"?) with few to no ecologically redeeming characteristics. At first I thought the whole idea was really stupid. I mean, seriously, a hobbit house? But then I started looking into earth sheltered homes, and I learned a few things.


